Compress Images by 80% with Zero Quality Loss! The Ultimate Guide to Website Speed Optimization
What is the most frustrating moment when running a website? It is when the page loading slows down after uploading high-quality images. Imagine uploading an 11MB image only to watch visitors leave before the page even opens... it's truly dizzying.
As a developer, I have faced this dilemma countless times. Keeping high quality burdens the file size, while reducing size makes the quality look poor. But that struggle ends now. I have found a way to reduce size by up to 80% while maintaining the quality.

The Real Reason Your Website is Slow: Image Size
One of the biggest causes of slow website loading speeds is images. according to Google research, as page load time goes from 1 second to 3 seconds, the probability of bounce increases by 32%. What if it hits 5 seconds? The bounce rate skyrockets to 90%.
Especially these days, with improved smartphone camera performance, photos exceeding 10MB are common. What happens if you upload these images directly to your website?
- Depletion of mobile user data
- High bounce rates due to slow loading
- Drop in search engine rankings (Bad for SEO)
- Increased server traffic costs
However, many say, "I can't give up on quality." That's correct. Especially for e-commerce or portfolio sites, image quality equals credibility. That's why we need size compression without quality loss.
Vivoldi Image Compression: 11.5MB → 1.3MB, Quality Remains
Vivoldi's image compression tool is special. No complex program installation is needed, and you can use it right in your web browser. Let me show you the actual test results.
Actual Compression Results
Original: 11.5MB → After: 1.3MB
Size Reduction Rate: 77.82%
Quality Loss: Almost indistinguishable to the naked eye
Isn't it amazing? The size has been reduced to almost one-ninth, but it's hard to tell the difference in quality compared to the original. This is possible thanks to the smart compression algorithm Vivoldi uses.

Supported Image Formats and Key Features
Support for Various Formats
Vivoldi supports almost all image formats used on the web.
- JPG/JPEG: The most common photo format
- PNG: Images requiring transparent backgrounds
- WebP: Next-generation image format developed by Google
- HEIC: Photo format taken on iPhones
- GIF: Animated images
Save Time with Batch Processing
Compressing one by one is inefficient. Vivoldi allows you to upload multiple images via drag and drop and compress them all at once. Preparing 10 images for a blog post? Select them all, upload, and the compression is done while you grab a cup of coffee.
All About Compression Settings
Vivoldi allows users to manually adjust the compression level. However, first-time users might wonder how to set it. Here are some practical tips.
💡 Recommended Settings
Quality Option: Select 'Auto Quality' (Maintains optimal balance)
Image Size: 1200~1920px width recommended for web posting
Note: Size does not change if set larger than the original
Setting the quality value higher reduces the compression rate but improves quality. Conversely, setting it lower reduces size more but may cause quality degradation. 'Auto Quality' automatically finds the optimal point between the two, providing the most satisfactory results in most cases.

Practical Application: Industry Case Studies
Theory is enough. Now let's look at how it is actually used through specific cases by industry. It is full of know-how you can apply immediately in practice.
Case 1: Success Story of Travel Blogger Minji Kim
Minji Kim is a 5-year travel blogger. She mainly used high-quality photos taken with a DSLR camera, averaging 8~15MB per photo. Uploading an average of 20 photos per post meant the total size reached 160~300MB.
The problem was the visitor bounce rate. Checking Google Analytics, the page load time averaged 6.8 seconds, and the bounce rate was a whopping 58%. It was even more serious for mobile users at 67%.
The change after adopting Vivoldi was dramatic.
Minji Kim's Blog Improvement Results (3-Month Comparison)
Before:
- Avg Page Load Time: 6.8 seconds
- Bounce Rate: 58% (Mobile 67%)
- Avg Time on Page: 1 min 15 sec
- Monthly Visitors: 8,500
- Google Avg Rank: 4.8
After (Applying Vivoldi Compression):
- Avg Page Load Time: 1.9 seconds (72% Improved)
- Bounce Rate: 31% (Mobile 35%) (47% Improved)
- Avg Time on Page: 3 min 42 sec (195% Increased)
- Monthly Visitors: 14,200 (67% Increased)
- Google Avg Rank: 2.3 (Up 2.5 positions)
Minji's workflow is simple. When organizing photos after a trip, she uploads the photos for the web to Vivoldi at once. She compresses them with the 'Auto Quality' option and resizes them to 1920px width. This reduces photos that were 8~15MB to 800KB~1.5MB.
"At first, I was worried the quality would drop. But comparing before and after, I couldn't tell the difference. In fact, readers comment more often saying 'The photos are beautiful' because they load faster. I can feel that fewer people leave while waiting for loading."
Especially impressive is the increase in AdSense revenue. As dwell time increased and page views grew, monthly average AdSense revenue jumped from 380,000 KRW to 670,000 KRW. Image compression alone generated an additional 290,000 KRW in monthly profit.
Case 2: Fashion Mall 'Style Up' CEO Junhyuk Park
Junhyuk Park runs an online fashion mall. Since product photos equal sales, high-quality images were non-negotiable. He uploads 1 main image, 8~12 detail images, and 5~8 fitting shots per product. That's a total of 15~20 images per product page.
The problem started when products exceeded 200 items. The total website size surpassed 12GB, and server traffic costs soared to 850,000 KRW per month. Furthermore, as product page loading slowed, cart abandonment rates increased.
Style Up Mall Improvement Results (6-Month Comparison)
Before:
- Product Page Load: Avg 5.2 seconds
- Cart Abandonment: 72%
- Monthly Server Cost: 850,000 KRW
- Total Site Size: 12.3GB
- Mobile Conversion Rate: 1.8%
After (Total Image Compression):
- Product Page Load: Avg 1.4 seconds (73% Improved)
- Cart Abandonment: 48% (33% Improved)
- Monthly Server Cost: 220,000 KRW (74% Saved)
- Total Site Size: 2.8GB (77% Reduced)
- Mobile Conversion Rate: 3.4% (89% Increased)
Junhyuk implemented a three-stage image compression strategy.
Stage 1: New Product Registration - All images are uploaded after compressing with Vivoldi. Main images are set to 1200x1200px, detail images to 800px, and thumbnails to 400x400px.
Stage 2: Bulk Processing Existing Products - Using the weekend, he downloaded all images for 200 existing products, compressed them, and re-uploaded them. It took about 8 hours, but the effects were immediate.
Stage 3: Regular Check - Once a month, check if there are any uncompressed images among newly registered ones.
"Initially, I hesitated because the workload seemed huge. But saving 630,000 KRW monthly in server costs made the ROI tremendous. Most of all, I was happiest when customers left reviews saying 'The site got faster.' The mobile purchase rate nearly doubled, and sales increased by an average of 28% compared to the previous month."
Case 3: UI/UX Designer Suhyeon Lee's Portfolio Site
Suhyeon Lee is a freelance UI/UX designer running a personal portfolio website. Due to the nature of a portfolio, high-quality images like high-res mockups, prototype screenshots, and design drafts are essential.
The issue was that after uploading 20 portfolio items, the entire website became too heavy. Since the first page showed thumbnails of the entire portfolio, initial loading took over 15 seconds. Potential clients were leaving before even seeing the portfolio.
Suhyeon Lee's Portfolio Site Improvement Results
Before:
- First Page Load: 15.3 seconds
- Portfolio Detail Load: 7.8 seconds
- Mobile Bounce Rate: 81%
- Inquiry Conversion: 2.1%
After (Image Optimization):
- First Page Load: 2.1 seconds (86% Improved)
- Portfolio Detail Load: 1.6 seconds (79% Improved)
- Mobile Bounce Rate: 28% (65% Improved)
- Inquiry Conversion: 7.3% (248% Increased)
Suhyeon divided image optimization into three levels.
Thumbnail Images: 400x300px, compressed to 80% quality. Fast loading on the first page is the priority.
Portfolio Main Images: 1920px width, compressed with Auto Quality. It needs to show high quality to those who click, but also load quickly.
Detailed Design Images: 1600px width, compressed with Auto Quality. Design drafts where detail is important remain sharp enough after compression.
"As a designer, I'm sensitive to image quality. At first, the idea of compression bothered me. But viewing images compressed with Vivoldi on a 27-inch monitor, I couldn't tell the difference. Instead, thanks to fast loading, more people viewed the portfolio to the end, and project inquiries actually increased by more than 3 times. Now, whenever I add a new project, I habitually run it through Vivoldi."
Common Success Points Found
Analyzing the 3 cases, there were common success factors.
- First impressions change: Fast loading pages create a positive first impression. You get evaluated as "professional" and "trustworthy."
- Mobile experience improves: Mobile users are particularly sensitive to data and loading speed. Compressed images significantly boost mobile conversion rates.
- SEO rankings rise: Google uses page speed as a ranking factor. Faster loading naturally leads to higher search rankings.
- Costs are reduced: Server traffic costs and CDN costs decrease noticeably.

Comparative Analysis with Other Compression Tools
Vivoldi isn't the only image compression tool. There are various choices like TinyPNG, Compressor.io, Squoosh, and ImageOptim. So what makes Vivoldi different? I actually compared and tested several tools with the same image.
Compression Performance Comparison Test
The test conditions were as follows. An 11.5MB high-resolution landscape photo (6000x4000px, JPG format) was compressed with each tool, and the results were compared.
Compression Performance Comparison (Original: 11.5MB)
Vivoldi (Auto Quality): 1.3MB (88.7% compressed) - Almost no quality loss
TinyPNG: 2.8MB (75.6% compressed) - Slight color change detected
Compressor.io: 1.9MB (83.5% compressed) - Good quality
Squoosh (Google): 1.5MB (87.0% compressed) - Excellent quality but complex to use
ImageOptim (Mac Only): 3.2MB (72.2% compressed) - Lossless compression standard
Looking at numbers alone, Vivoldi shows the highest compression rate. But high compression isn't always good. You must consider quality as well.
Quality Retention Ability Comparison
Comparing details by zooming in 100% on compressed images, Vivoldi and Squoosh were excellent. Differences appeared especially in sky gradients, leaf details, and shadow areas.
TinyPNG had a somewhat lower compression rate, but color information loss was visible to the naked eye when zoomed in. Banding was visible, especially in the blue sky. Compressor.io was generally okay, but some details in dark areas were crushed.
Usability Comparison
This is an overwhelming victory for Vivoldi. The characteristics of each tool are as follows.
Vivoldi:
- No installation needed, immediate use in web browser
- Simultaneous upload of multiple images via Drag & Drop
- Easy for beginners with 'Auto Quality' option
- Resize possible simultaneously with compression
- Integrated WebP conversion and image editing features
- Free, no signup required
TinyPNG:
- Web-based, simple to use
- Free version limited to 20 images at a time, 5MB per file
- Compression options cannot be adjusted (Auto processing only)
- Paid plan required for bulk work
Squoosh (Google):
- Open-source tool made by Google
- Only processes one by one (No batch processing)
- Detailed option adjustment possible but complex for beginners
- Need to understand codecs and format settings for optimal results
Compressor.io:
- Web-based, simple interface
- Free version processes only 1 image at a time
- Lossless/Lossy compression selectable
- Batch processing not available
ImageOptim (Mac Only):
- Program installation required
- Only usable on Mac (Not available on Windows)
- Specialized in lossless compression
- Compression rate is somewhat low
- Suitable for developers
Speed Test
I measured the time taken to process 10 images of 10MB each.
Processing Speed Comparison (Based on 10 images)
Vivoldi: Approx. 45 sec (Batch upload)
TinyPNG: Approx. 35 sec (Batch upload)
Squoosh: Approx. 8 min (One by one)
Compressor.io: Approx. 7 min 30 sec (One by one)
ImageOptim: Approx. 1 min 20 sec (Auto process after Drag & Drop)
Tools capable of batch processing are overwhelmingly faster. Tools like Squoosh or Compressor.io that require processing one by one are inconvenient for practical use.
Cost Comparison
Most tools offer free versions, but there are limitations.
Vivoldi: Completely free, no limits
TinyPNG: Free (500 limit/month) / Pro $25/month (25,000 limit)
Compressor.io: Free (1 at a time) / Pro $9/month (Batch processing)
Squoosh: Completely free, open source
ImageOptim: Completely free
For bloggers or small malls, free tools are enough, but if you need bulk work, a tool like Vivoldi that allows unlimited batch processing is advantageous.
Overall Evaluation: Which Tool Should You Choose?
Each tool has pros and cons, but here are recommendations by user type.
Beginners & General Bloggers: Recommend Vivoldi. You can get optimal results with 'Auto Quality' without complex settings. Batch processing saves time too.
E-commerce & Mass Image Processing: Recommend Vivoldi or TinyPNG Pro. If you need to process hundreds of images, batch processing is essential.
Developers & Technical Users: Recommend Squoosh or ImageOptim. If you can make fine adjustments and understand specific codecs, you can produce optimal results.
Mac Users & Lossless Preference: Recommend ImageOptim. Reduces size by removing metadata without quality loss.
Highest Compression & Quality Balance: Recommend Vivoldi or Squoosh. Both tools have excellent balance between compression rate and quality.
💡 Pro Tip: Tool Combination Strategy
I use two tools in parallel for work. I process general tasks quickly in batches with Vivoldi, and optimize particularly important images (Main banners, representative images) by manually adjusting with Squoosh. This captures both efficiency and quality.
SEO and User Experience, Catching Two Birds with One Stone
Google uses page loading speed as a search ranking factor. This is called 'Core Web Vitals', and among them, LCP (Largest Contentful Paint) is important. Simply put, it measures how fast the page's largest content (usually an image) loads.
Reducing image size by 80% dramatically improves the LCP score. In fact, after compressing all images on the site I run, there were the following changes.
- Avg Page Load Time: 4.2 sec → 1.8 sec
- Bounce Rate: 45% → 28%
- Avg Time on Page: 1 min 30 sec → 2 min 45 sec
- Search Ranking: Rose by avg 3.2 positions
It's clearer with numbers, right? Image compression is not just reducing size, but a strategy to improve business performance.
Consideration for Mobile Users
About 70% of Korean web traffic comes from mobile. Mobile users worry about data fees, and loading speeds are slower in non-Wi-Fi environments. Compressed images provide a faster and more pleasant experience for mobile users.
This difference is even more stark in unstable network places like subways or cafes. An 11.5MB image might fail to load or take tens of seconds, but a 1.3MB image loads in 2~3 seconds.
Additional Features: WebP Conversion and Image Editing
Vivoldi is not just a simple compression tool. It also offers WebP conversion, which is really useful. WebP is a next-generation image format that provides the same quality at 30~50% smaller size than JPG or PNG.
Convert to WebP while compressing? The size reduces further, and you can experience faster rendering on modern browsers. However, some older browsers might not support it, so it is recommended to prepare a JPG version as well for important images.
Image editing features are also integrated, enabling simple crop or rotate tasks before compression. You don't need to open a separate image editing program, further shortening work time.
Server Cost Savings Effect
As a developer, the part I paid special attention to is server traffic cost reduction. If image size is reduced by 80%, the amount of data transferred also decreases by 80%. This leads directly to server cost savings.
For example, assume a site with 1,000 daily visitors viewing an average of 10 images.
Before Compression: 1,000 visitors × 10 images × 11.5MB = 115GB/day = 3,450GB/month
After Compression: 1,000 visitors × 10 images × 1.3MB = 13GB/day = 390GB/month
Savings: 3,060GB/month
If you use a cloud server, this difference can result in a cost difference of hundreds of thousands of won per month. This is especially true for shopping malls or media sites with high traffic.
Frequently Asked Questions and Solutions
Q. Is there really no quality difference after compression?
According to test results, it is difficult to distinguish the difference with the naked eye for web posting. However, if you need high-resolution images for printing, we recommend keeping the original separately. It is best to manage web and print versions separately.
Q. Does compression take a long time?
It depends on image size and count, but for 10 images of 10MB, it takes about 30 seconds to 1 minute. Upload speed may vary depending on the internet environment.
Q. What if I compress an already compressed image again?
The additional compression effect is minimal, and quality degradation may occur instead. We recommend compressing images only once from the original.
Q. Is it free?
Vivoldi's image compression tool is provided for free. You can use it immediately without separate signup or installation.
Start Right Now
Image compression is no longer a choice but a necessity. There are benefits in all aspects: user experience, SEO, server costs, and mobile optimization. Especially if there is a tool like Vivoldi that can drastically reduce size without quality loss, there is no reason not to use it.
Check all images on your website starting today. If there are images over 5MB, compress them immediately. Visitors will be satisfied with the faster loading speed, and Google will rate your site higher.
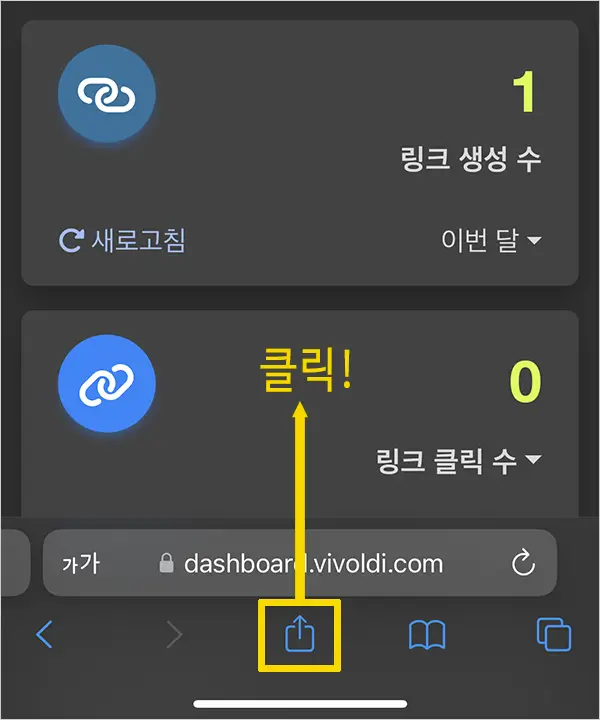
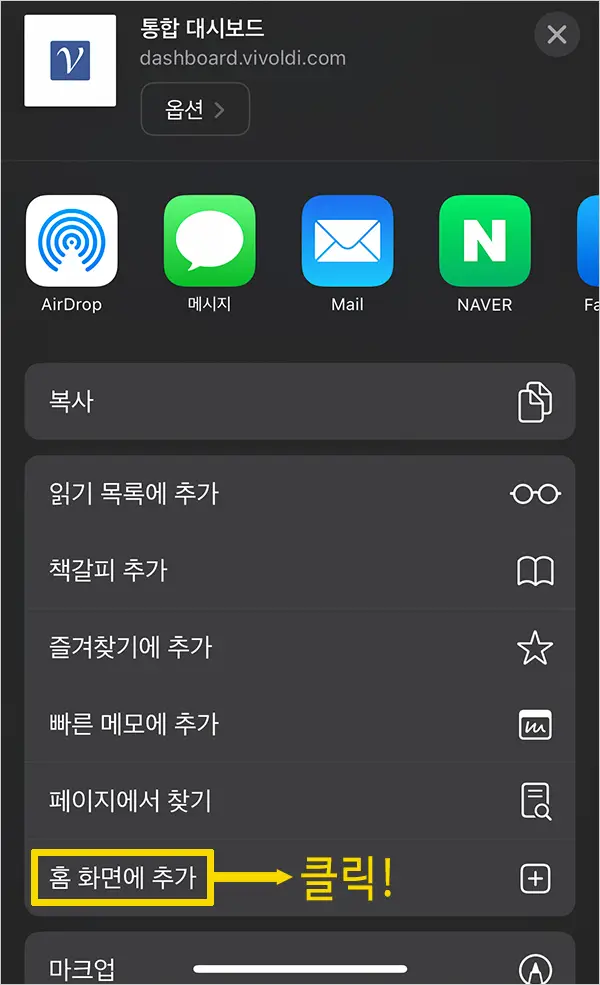
🚀 Start Compressing Images with Vivoldi Now
Bookmark it and make it a habit to compress before every upload.
You will be able to feel your website getting faster.
Web performance optimization is not a complex technology. If you start with small practices like image compression, you can create big changes. Until the day your website becomes faster and more efficient, Vivoldi will be with you.